In today’s fast-paced business landscape, effective communication with your customers is paramount. Whether it’s responding to inquiries, addressing feedback, or handling complaints, a seamless email integration can significantly enhance your customer service capabilities. In this guide, we’ll walk you through the process of connecting your Stames account to your email system, using Postmark as our example, to efficiently manage customer interactions.
Step 1: Sign Up and Set Up Your Postmark Account
- If you haven’t already, visit the Postmark website (postmarkapp.com) and sign up for an account.
- Complete the account setup process, including email verification and configuration of your sender details.
Step 2: Gather Necessary Information
- Log in to your Stames account, where you’ll access the settings or integration section.
- Identify the specific email integration feature you wish to set up. This could include a general support email, an email for feedback and complaints, or any other email-based customer interaction channel.
Step 3: Configure Your Postmark Account
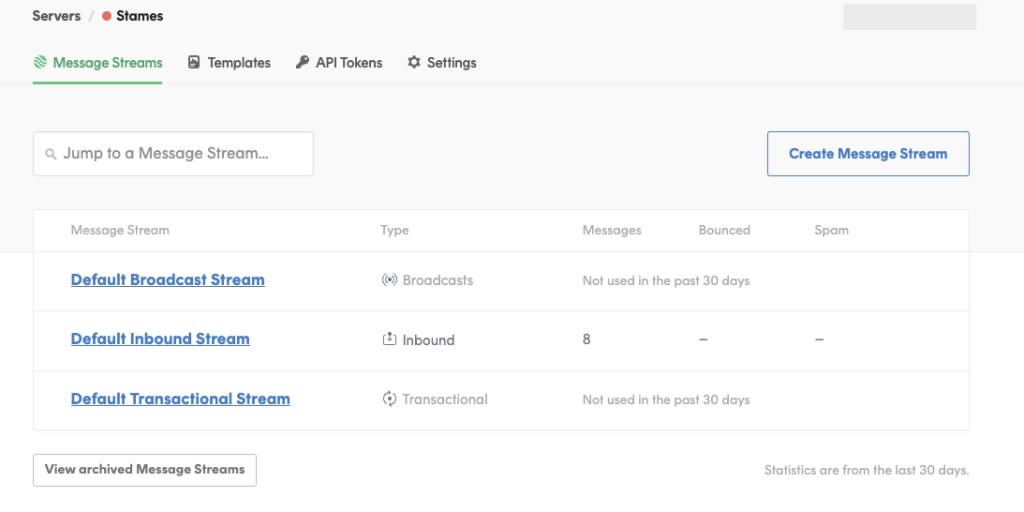
- Access your Postmark dashboard and navigate to the “Server” section.
- Create a new or use the default Inbound Server in Postmark, which will serve as the dedicated email channel for your Stames account.
- Click on the Inbound Stream you just created and then on “Setup Instructions” tab.
- On “Webhook”, enter the Postmark webhook endpoint: https://www.stamesoft.com/channel/v1/postmark/, then click on “Save changes”.
- Copy and save the server’s inbound email address. Example: e073db273527378e3f177d043e7b17d1e@inbound.postmarkapp.com
Step 4: Configure Your Stames Account
- Return to your Stames account settings and the integration settings.
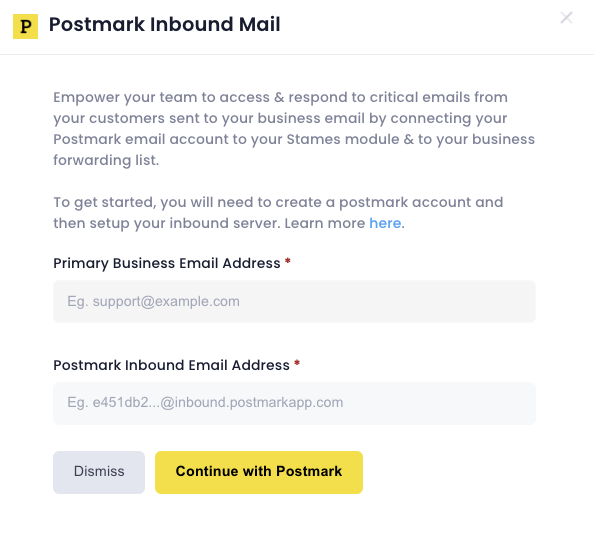
- Click on Channels & Apps tab and then on Postmark Inbound Mail to popup a dialog box.
- Go to Postmark integration dialog box on Stames integration page to paste into Postmark Inbound Email Address field.
NOTE: To be able to connect your business email for inbound mails, you must first setup that email for outbound mails.
Step 6: Add Postmark Inbound Email Address to Forwarding List
- Log into your business domain email and add your Postmark Inbound Email Address to your mail forwarding list. Click “Save changes”. You ‘re now all set.
Step 6: Test the Connection
- Before finalizing the setup, it’s crucial to test the connection to ensure seamless email communication.
- Send a test email from your any email account to the designated email address associated with your Postmark server.
- Check your Postmark dashboard to confirm that the test email was received successfully.
- Log into your Stames software module, then go to the Manage Requests page to access the test email.
- Click on Reply and send a test response to the test email sender. Check your test sender email to see the response.
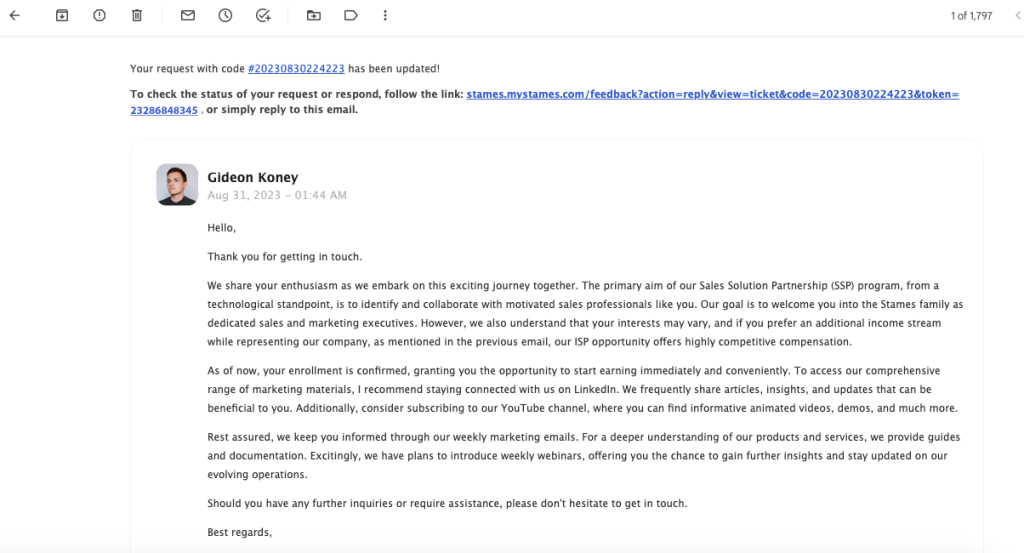
Screenshot of how email response appears to customers from Stames software.
Step 7: Automate Responses and Routing
- To streamline customer interactions, consider setting up automated responses and routing rules within your Stames account.
- Automated responses can acknowledge receipt of customer emails and provide initial information or instructions.
- Routing rules can direct emails to the appropriate team or department.
Step 8: Monitor and Optimize
- With your email integration in place, regularly monitor your email channel for incoming customer inquiries, requests, feedback, and complaints.
- Gather data on response times, customer satisfaction, and common issues to continually optimize your customer service processes.
Step 9: Train Your Team
- Ensure that your customer service team is well-trained in using the integrated email system.
- Provide guidelines for responding to different types of customer emails and empower your team to resolve issues effectively.
Step 10: Maintain Security and Compliance
- Pay careful attention to data security and compliance with regulations like GDPR when handling customer emails.
- Implement encryption and data protection measures to safeguard sensitive customer information.
By following these steps, you can seamlessly connect your Stames account to email, allowing you to receive and manage customer emails, requests, queries, feedback, and complaints efficiently. This integration enhances your customer service capabilities, ultimately leading to improved customer satisfaction and loyalty.